LinkedIn Job Scraper: Automate Your Entire Job Search with Ai (2026)
Build a LinkedIn job scraper in 20 minutes with n8n and Apify. Ai scores each job against your skills. Free template included.

Matt Payne
March 25, 2026
If you run an agency with even a handful of team members, you already know how much time gets eaten up by project assignment. A new client fills out a form, and then someone (probably you) has to figure out who handles it, open Slack, type out the details, and hope nothing falls through the cracks. The Go High Level Slack integration fixes that by letting you automatically send project details to the right teammate in Slack the moment a new contact submits a form.
Let’s walk through the full setup required to integrate your slack workspace to your GHL using GoHighLevel workflows and automate a piece of your project management.
The Go High Level Slack integration is a built in GHLworkflow action that lets you send automated Slack messages (things like direct messages, private channel messages, or public channel messages) directly from GoHighLevel workflows. It connects your GoHighLevel account to your Slack workspace so you can notify team members, assign projects, and streamline communication without leaving either platform.
The most common use case for the Slack to GHL workflow is automatically notifying a specific user in Slack when a new contact fills out a form, a new lead enters your pipeline, or a GoHighLevel contact moves to a new stage. Every new message reaches the right person at the right time. But it can go further than simple notifications. By combining the Slack action with if/else branches and user assignment logic, you can build workflows that dynamically route projects to the right person on your team. This kind of team collaboration happens automatically, without any manual work.
Before you can send messages from GoHighLevel to Slack, you need to connect your Slack workspace. This is a one-time setup that is super easy.
Once connected, GoHighLevel adds a Lead Connector bot to your Slack workspace. This bot is what actually sends the messages. You can send messages to any public channel, private channel, or individual Slack user in that workspace. The whole process takes just a few clicks and you will be ready to start automating within minutes. One thing to note: you can connect multiple Slack channels and workspaces to a single GoHighLevel account. This is useful if you run different teams or sub-agencies that each have their own Slack workspace but share a GoHighLevel account. If you ever create a new account or onboard a new sub-agency, you can add their workspace in a couple of clicks.

The simplest version of this automation has two steps: a form submission trigger and a Slack action. When a new contact fills out your form, GoHighLevel immediately sends a Slack message to the person who needs to handle it. Here is exactly how to build it.
Go to Automations > Workflows in GoHighLevel and create a new workflow from scratch. Add a trigger and select Form Submitted. Choose the specific form you want to trigger this workflow, for example a "Website Onboarding Form" that collects a client's name, existing website URL, and a detailed explanation of what they need.

Click the plus button to add an action, then search for Slack. Select the Slack action and configure it:
In the message content field, write out what your teammate needs to see. Use GoHighLevel custom values to pull in data from the form submission dynamically. A good template looks like this:
EXAMPLE MESSAGE TEMPLATE
New Website Project Needed
--------------------------
Client Name: {{contact.name}}
Current Website: {{contact.existing_website}}
What They Need: {{contact.detailed_explanation}}
Every time a new contact submits that form, your web designer gets a direct message in Slack with the full project details. A new message appears in their DMs within seconds. No manual forwarding, no copy-pasting from emails, no projects slipping through the cracks.

The simple setup works great when every form submission goes to the same person. But what happens when you have multiple team members handling different types of work? If you run a digital marketing agency with a web designer and an automation builder, you do not want automation requests landing on your web designer's desk.
This is where conditional logic and the "Assigned User" feature come in. Instead of hardcoding a specific Slack user, you build an if/else branch that checks what the client needs and assigns the project to the right person before sending the Slack notification.
After the form submission trigger, add an If/Else condition. Set it to check the "Detailed Explanation" field (or whatever field captures the type of work requested):

On each branch, add an "Assign to User" action before the Slack notification. This assigns the GoHighLevel contact to a specific team member in your CRM:
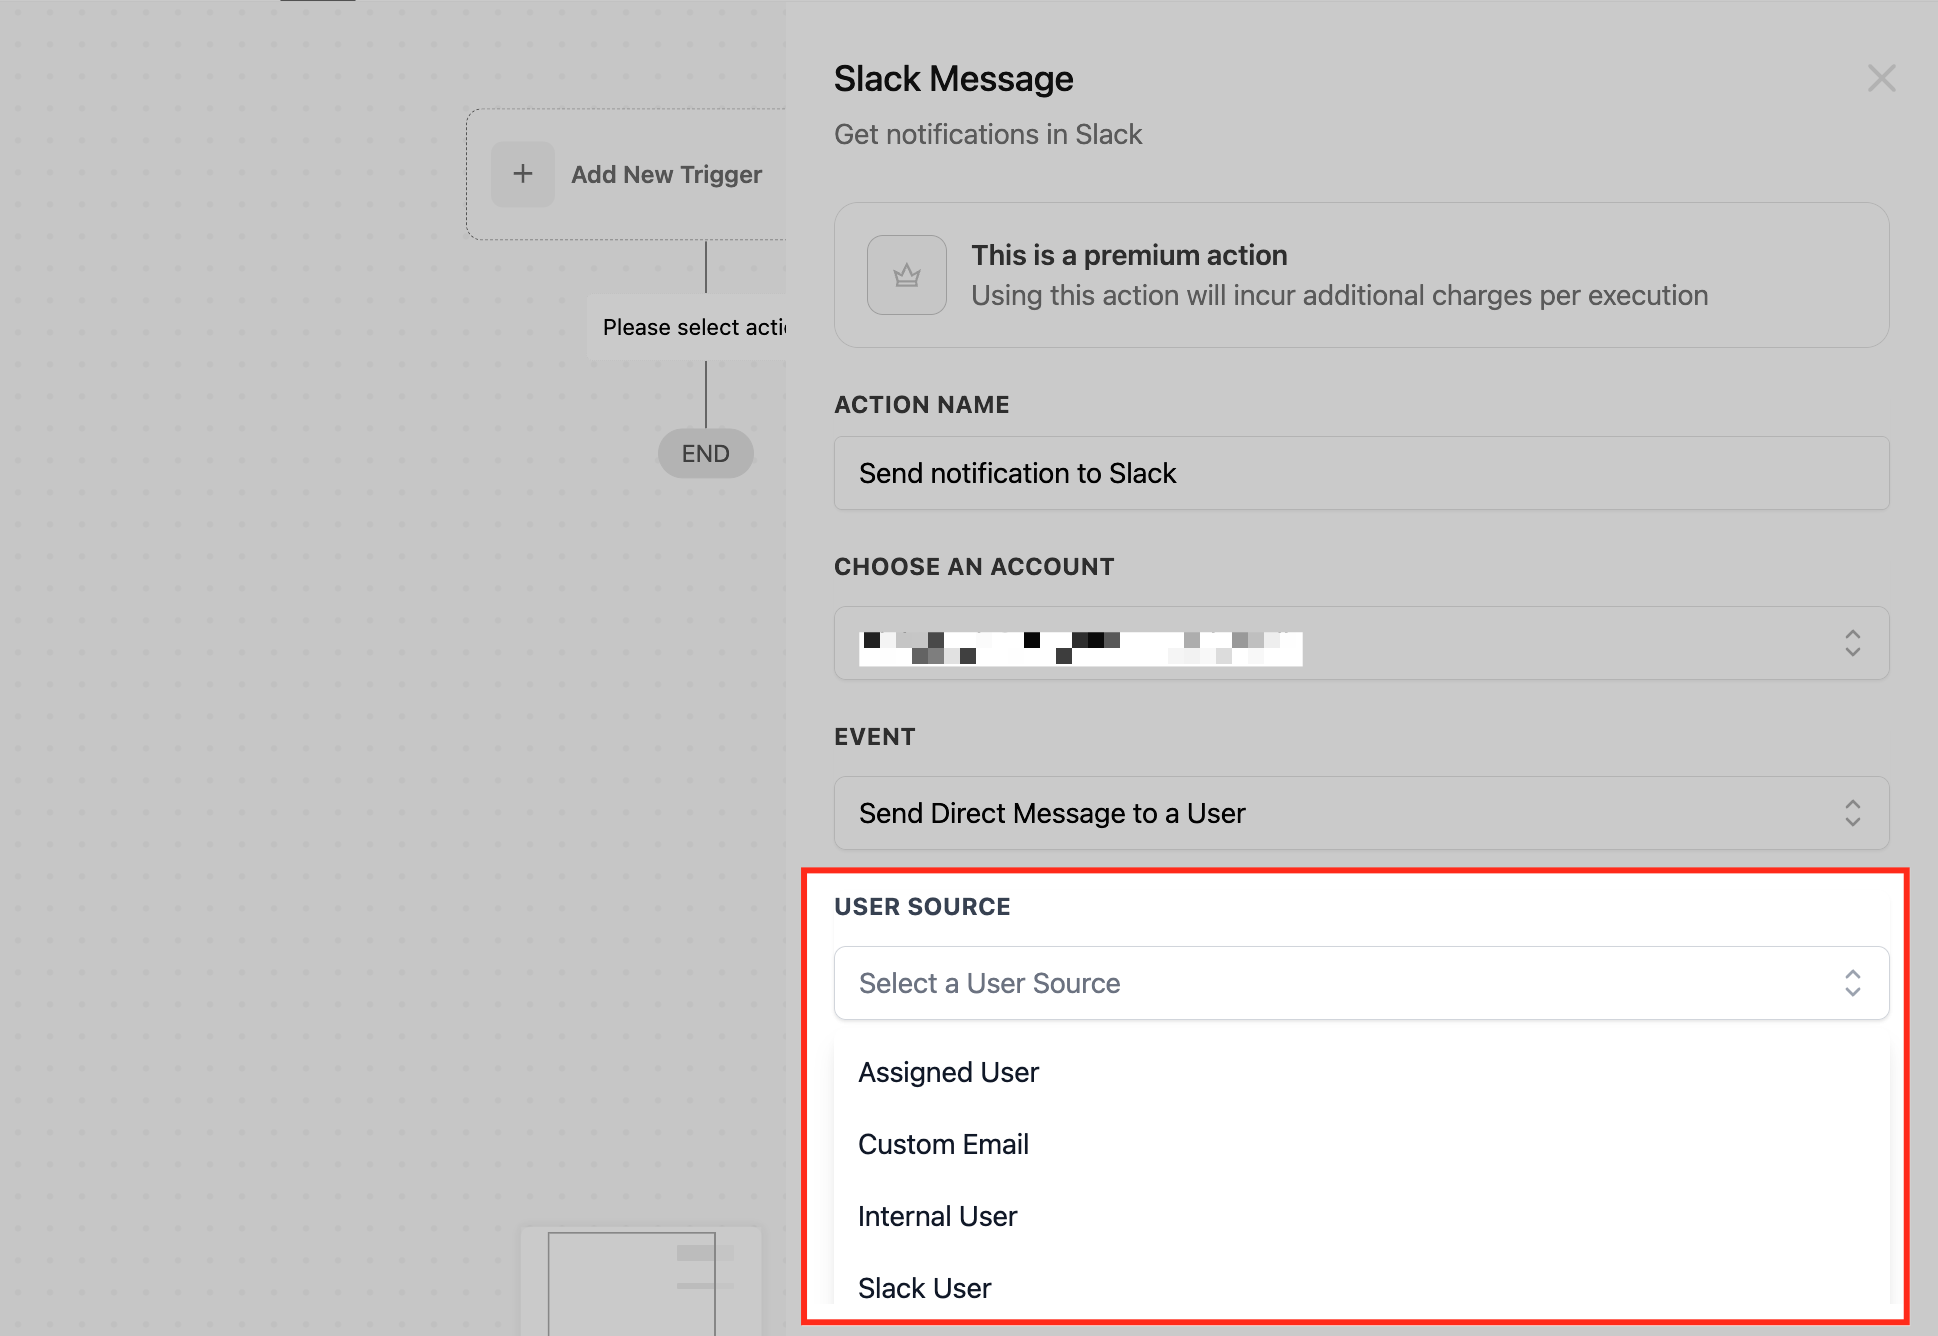
This step is critical because it is what makes the Slack notification dynamic. Instead of picking a specific Slack user in the Slack action, you will use the "Assigned User" option, which automatically sends the message to whoever was just assigned.
Now add a single Slack action at the end of the workflow (after the branches merge). Instead of setting the user source to "Slack User," set it to "Assigned User." This tells GoHighLevel to send the Slack message to whichever user was assigned in the previous step.
With this setup, the same Slack action handles both scenarios. If the new lead asked for an automation, the message goes to your automation builder. If they asked for a website, it goes to your web designer. One Slack action, multiple possible recipients, zero manual routing.

The GoHighLevel Slack integration gives you three options for where your messages land. Each one fits a different workflow depending on how your team communicates.
This sends a private Slack message directly to one person. Best for project assignments where only one team member needs to see it. The message shows up in their DMs from the Lead Connector bot.
This posts the message to a specific channel that is private. Use this when a small group needs to see incoming projects, like a private "sales-leads" or "new-projects" channel that only your project managers can access. Each new message lands where it belongs without manual forwarding.
One important detail from the official docs: when sending messages to a private channel, the messages appear as the user who created the Slack integration, not the Lead Connector bot. So it looks like a manual message from that person. Keep this in mind when choosing between private and public channels for your workflows.
This posts to a public channel visible to everyone in the Slack workspace. Good for transparency, like a "client-updates" channel where the whole team can see what is coming in.
For most project assignment workflows, direct messages or private channels work best. Public channels are better suited for general notifications like new lead alerts or campaign performance updates where the whole team benefits from visibility.
When you configure the Slack action to send a direct message, GoHighLevel gives you four user source options. Picking the right one determines who receives the notification.
There is also a Lead Connector user that appears in your Slack workspace. This is the internal HighLevel bot. You can send messages to it if you want notifications to flow into Slack as a centralized feed rather than going to a specific person. Think of it as a notification stream you can check on your own schedule.
The form-to-Slack workflow is just the starting point. Here are several practical ways agencies and teams use this integration to save time and keep their operations running smoothly.
When a new contact fills out an onboarding form, GoHighLevel checks what service they need, assigns the right team member, and sends a Slack notification with all the project details. No manual triage needed.
Every time a new lead enters your pipeline from a landing page, webinar registration, or ad campaign, a Slack message goes to your sales channel with the lead's name, email, and source. Your team can jump on new leads within minutes instead of hours.
When a GoHighLevel contact moves from "Qualified" to "Proposal Sent" in your pipeline, automatically notify the account manager in Slack. No one misses a stage change, and handoffs between team members happen seamlessly.
Set up instant notifications for specific triggers like appointment bookings, payment received, or survey completions. Your team gets a Slack notification the moment something important happens in your CRM.
The Slack action is a premium workflow action, which means each execution counts toward your account usage. You do get a batch of free executions when you first enable it. For most agencies sending a handful of Slack notifications per day, the usage is minimal. We have a special code for 30 day free trial as well: GHL.
Yes. You can add multiple Slack actions in the same workflow, each targeting a different user or channel. You can also use a single Slack action with the Assigned User source and let if/else branches determine who receives the message dynamically.
Any workflow trigger works with the Slack action. Choosing triggers depends on your use case, but the most common are Form Submitted, Pipeline Stage Changed, Appointment Booked, and Contact Created. You can also use tag-based triggers, invoice triggers, or custom webhook triggers. Every time a trigger fires, a new message gets generated and sent to your configured destination.
Yes. GoHighLevel supports connecting multiple Slack workspaces from the Settings > Integrations page. This is useful if you manage sub-accounts or separate teams that each have their own Slack workspace. When you create a new account or sub-account in GoHighLevel, you can connect a separate Slack workspace to each one.
You can add a Google Sheets action alongside the Slack action in your workflow. For example, when a new contact submits a form, the workflow can simultaneously send a Slack notification to your team and log the submission details in a Google Sheets spreadsheet for tracking. Both actions fire from the same trigger.
Our internal team of engineers are experts in GHL and focus on automating backend processes for agencies and service companies. We work daily on these type of workflows and build complex workflows on top of GHL that include ai systems. Domain specific engineers are available starting at $33/hr.
